-
SQLite 실습1-1Android_Kotlin/Android_공부 2023. 7. 31. 12:19728x90
SQLite를 이용하여 DB를 운용해볼수 있는 간단한 예제입니다.
- 먼저 레이아웃을 만들어 줍니다.
💡 TableLayout을 만든이유 : 데이터 베이스의 값에따라 동적으로 테이블 로우를 생성하기 위해 TableLayout을 만들었습니다.<?xml version="1.0" encoding="utf-8"?> <LinearLayout xmlns:android="http://schemas.android.com/apk/res/android" xmlns:app="http://schemas.android.com/apk/res-auto" xmlns:tools="http://schemas.android.com/tools" android:orientation="vertical" android:layout_width="match_parent" android:layout_height="match_parent" tools:context=".MainActivity"> <LinearLayout android:layout_width="match_parent" android:layout_height="wrap_content" android:orientation="horizontal"> <TextView android:layout_width="0dp" android:layout_weight="1" android:layout_height="wrap_content" android:gravity="center" android:text="제품번호" tools:ignore="HardcodedText" /> <EditText android:id="@+id/pIdEdit" android:layout_width="0dp" android:layout_height="wrap_content" android:layout_weight="3" tools:ignore="SpeakableTextPresentCheck" /> </LinearLayout> <LinearLayout android:layout_width="match_parent" android:layout_height="wrap_content" android:orientation="horizontal"> <TextView android:layout_width="0dp" android:layout_weight="1" android:layout_height="wrap_content" android:gravity="center" android:text="제품이름"/> <EditText android:id="@+id/pNameEdit" android:layout_width="0dp" android:layout_height="wrap_content" android:layout_weight="3" tools:ignore="TouchTargetSizeCheck,SpeakableTextPresentCheck" /> </LinearLayout> <LinearLayout android:layout_width="match_parent" android:layout_height="wrap_content" android:orientation="horizontal"> <TextView android:layout_width="0dp" android:layout_weight="1" android:layout_height="wrap_content" android:gravity="center" android:text="제품수량"/> <EditText android:id="@+id/pQuantityEdit" android:layout_width="0dp" android:layout_height="wrap_content" android:layout_weight="3" tools:ignore="TouchTargetSizeCheck,SpeakableTextPresentCheck" /> </LinearLayout> <LinearLayout android:gravity="center" android:paddingVertical="10dp" android:layout_width="match_parent" android:layout_height="wrap_content"> <Button android:id="@+id/insertbtn" android:text="INSERT" android:layout_margin="5dp" android:layout_width="wrap_content" android:layout_height="wrap_content"/> <Button android:id="@+id/findbtn" android:text="FIND" android:layout_margin="5dp" android:layout_width="wrap_content" android:layout_height="wrap_content"/> <Button android:id="@+id/deletebtn" android:text="DELETE" android:layout_margin="5dp" android:layout_width="wrap_content" android:layout_height="wrap_content"/> <Button android:id="@+id/updatebtn" android:text="UPDATE" android:layout_margin="5dp" android:layout_width="wrap_content" android:layout_height="wrap_content"/> </LinearLayout> <TableLayout android:id="@+id/tableLayout" android:layout_marginHorizontal="10dp" android:layout_marginVertical="10dp" android:layout_width="match_parent" android:layout_height="match_parent"> </TableLayout> </LinearLayout> - SQLite 데이터베이스를 사용하기 위해 필요한 기능들을 제공하기 위해 MyDBHelper 클래스를 정의합니다.
package com.example.myapplication0515 import android.content.ContentValues import android.content.Context import android.database.sqlite.SQLiteDatabase import android.database.sqlite.SQLiteOpenHelper import android.database.Cursor import android.graphics.Color import android.view.Gravity import android.widget.TableRow import android.widget.TextView import android.widget.TableRow.LayoutParams class MyDBHelper(val context: Context?) : SQLiteOpenHelper(context, DB_NAME, null, DB_VERSION) { companion object{ val DB_NAME ="mydb.db" val DB_VERSION=1 val TABLE_NAME="products" val PID ="pid" val PNAME = "pname" val PQUANTITY="pquantity" } fun getAllRecord(){ val strsql ="select * from $TABLE_NAME;" val db=readableDatabase val cursor=db.rawQuery(strsql,null) showRecord(cursor) cursor.close() db.close() } private fun showRecord(cursor: Cursor) { cursor.moveToFirst() val recordCOunt = cursor.count val attrcount=cursor.columnCount val activity = context as MainActivity activity.binding.tableLayout.removeAllViewsInLayout() //타이를 만들기 val tablerow= TableRow(activity) val rowParam=TableRow.LayoutParams(TableRow.LayoutParams.MATCH_PARENT,TableRow.LayoutParams.WRAP_CONTENT) tablerow.layoutParams=rowParam val viewParam = TableRow.LayoutParams(0,100,1f) for(i in 0 until attrcount) { val textView = TextView(activity) textView.layoutParams= viewParam textView.text = cursor.getColumnName(i) textView.setBackgroundColor(Color.LTGRAY) textView.textSize = 15.0f textView.gravity = Gravity.CENTER tablerow.addView(textView) } activity.binding.tableLayout.addView(tablerow) if(cursor.count==0) return //레코드 추기하기 do{ val row = TableRow(activity) row.layoutParams=rowParam for(i in 0 until attrcount) { val textView = TextView(activity) textView.layoutParams= viewParam textView.text = cursor.getString(i) textView.textSize = 15.0f textView.gravity = Gravity.CENTER row.addView(textView) } activity.binding.tableLayout.addView(row) }while (cursor.moveToNext()) } fun insertProduct(product: Product):Boolean{ val values = ContentValues() values.put(PNAME,product.pName) values.put(PQUANTITY,product.pQuantity) val db=writableDatabase val flag = db.insert(TABLE_NAME,null,values)>0 db.close() return flag } //테이블 생성 override fun onCreate(db: SQLiteDatabase?) { val create_table = "create table if not exists $TABLE_NAME("+ "$PID integer primary key autoincrement, "+ "$PNAME text, " + "$PQUANTITY integer);" db!!.execSQL(create_table) } //업그래드하는 기능 override fun onUpgrade(db: SQLiteDatabase?, oldVersion: Int, newVersion: Int) { val drop_table ="drop table if exists $TABLE_NAME;" db!!.execSQL(drop_table) onCreate(db) } fun findProduct(name: String): Boolean { val strsql = "select * from $TABLE_NAME where $PNAME = '$name';" val db=readableDatabase val cursor=db.rawQuery(strsql,null) val flag = cursor.count!=0 showRecord(cursor) cursor.close() db.close() return flag } }- 코드 전체 설명
- SQLiteOpenHelper : SQLiteOpenHelper는 안드로이드에서 SQLite 데이터베이스를 생성, 업그레이드, 연결 등의 작업을 도와주는 Helper 클래스입니다. MyDBHelper 클래스는 SQLiteOpenHelper 클래스를 상속받아 SQLite 데이터베이스의 생성과 업그레이드를 담당합니다.
- MyDBHelper : MyDBHelper 클래스는 SQLiteOpenHelper를 상속받아 SQLite 데이터베이스를 생성하고 업그레이드하는 기능을 제공합니다.
- onCreate() : onCreate() 함수는 SQLite 데이터베이스가 최초로 생성될 때 호출되는 함수입니다. 따라서 MyDBHelper 클래스에서는 onCreate() 함수를 override하여, PRODUCTS 테이블을 생성하는 SQL 쿼리문을 작성하고, execSQL() 함수를 사용하여 해당 쿼리문을 실행합니다.
- onUpgrade() : onUpgrade() 함수는 SQLite 데이터베이스의 버전이 업그레이드될 때 호출되는 함수입니다. 따라서 MyDBHelper 클래스에서는 onUpgrade() 함수를 override하여, PRODUCTS 테이블을 삭제하는 SQL 쿼리문을 작성하고, execSQL() 함수를 사용하여 해당 쿼리문을 실행한 후, onCreate() 함수를 호출하여 PRODUCTS 테이블을 다시 생성합니다.
- 코드 전체 설명
단위 코드별 설명
이 코드는 상수 변수를 선언하는 Kotlin의 companion object를 사용하여 데이터베이스와 관련된 정보를 정의하는 부분입니다.
- DB_NAME : 데이터베이스 이름을 나타냅니다.
- DB_VERSION : 데이터베이스의 버전을 나타냅니다.
- TABLE_NAME : 데이터베이스에 있는 테이블의 이름을 나타냅니다.
- PID, PNAME, PQUANTITY : 테이블의 컬럼 이름을 나타냅니다.
-
- companion object{ val DB_NAME ="mydb.db" val DB_VERSION=1 val TABLE_NAME="products" val PID ="pid" val PNAME = "pname" val PQUANTITY="pquantity" }
MyDBHelper.kt
마지막으로 어플 실행을 위해 MainActivity를 작성합니다.
package com.example.myapplication0515 import androidx.appcompat.app.AppCompatActivity import android.os.Bundle import android.view.LayoutInflater import android.widget.Toast import com.example.myapplication0515.databinding.ActivityMainBinding class MainActivity : AppCompatActivity() { lateinit var binding: ActivityMainBinding lateinit var myDBHelper: MyDBHelper override fun onCreate(savedInstanceState: Bundle?) { super.onCreate(savedInstanceState) binding = ActivityMainBinding.inflate(LayoutInflater.from(this)) setContentView(binding.root) init() getAllRecord() } fun getAllRecord(){ myDBHelper.getAllRecord() } fun clearEditText(){ binding.apply { pIdEdit.text.clear() pNameEdit.text.clear() pQuantityEdit.text.clear() } } private fun init(){ myDBHelper = MyDBHelper(this) binding.apply { insertbtn.setOnClickListener { val name = pNameEdit.text.toString() val quantity = pQuantityEdit.text.toString().toInt() val product=Product(0,name,quantity) //삽입하는 기능 구현 val result = myDBHelper.insertProduct(product) if(result){ getAllRecord() Toast.makeText(this@MainActivity,"Data INSERT SUCCESS",Toast.LENGTH_SHORT).show() }else{ Toast.makeText(this@MainActivity,"Data INSERT SUCCESS",Toast.LENGTH_SHORT).show() } clearEditText() } findbtn.setOnClickListener { val name = pNameEdit.text.toString() val result = myDBHelper.findProduct(name) if(result){ Toast.makeText(this@MainActivity,"RECORD FOUND",Toast.LENGTH_SHORT).show() }else{ Toast.makeText(this@MainActivity,"NOT MATCH FOUND",Toast.LENGTH_SHORT).show() } clearEditText() } deletebtn.setOnClickListener { } updatebtn.setOnClickListener { } } } }findbtn.setOnClickListener: findProduct() 함수는 데이터베이스에서 제품 이름을 검색하고, 해당 제품이 존재하면 true를 반환하고, 그렇지 않으면 false를 반환합니다. findbtn 버튼을 클릭하면 pNameEdit의 텍스트 값을 가져와 name 변수에 할당합니다. 그리고 **myDBHelper.findProduct(name)**을 호출하여 데이터베이스에서 해당 제품을 찾습니다. 이 함수가 반환하는 결과에 따라 적절한 메시지가 표시됩니다. 찾은 경우 "RECORD FOUND", 찾지 못한 경우 "NOT MATCH FOUND" 메시지가 토스트 메시지로 표시됩니다. 마지막으로 clearEditText() 함수를 호출하여 입력 필드를 지웁니다.
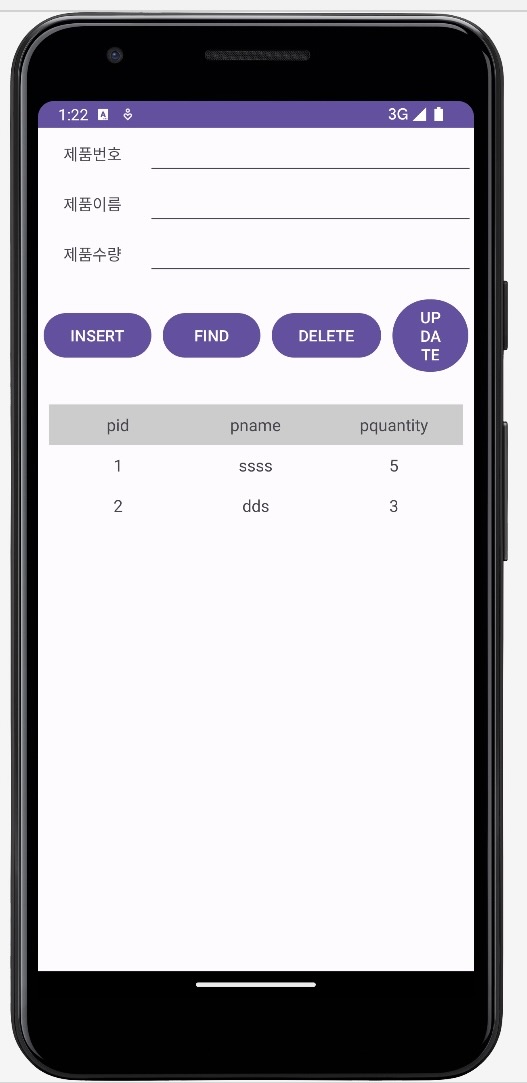
실행 화면
트러블 슈팅
package com.example.myapplication0515

import android.content.ContentValues
import android.content.Context
import android.database.sqlite.SQLiteDatabase
import android.database.sqlite.SQLiteOpenHelper
import android.database.Cursor
import android.graphics.Color
import android.view.Gravity
import android.widget.TableRow
import android.widget.TextView

class MyDBHelper(val context: Context?) : SQLiteOpenHelper(context, DB_NAME, null, DB_VERSION) {
    companion object{
        val DB_NAME ="mydb.db"
        val DB_VERSION=1
        val TABLE_NAME="products"
        val PID ="pid"
        val PNAME = "pname"
        val PQUANTITY="pquantity"
    }
    fun getAllRecord(){
        val strsql ="select * from $TABLE_NAME;"
        val db=readableDatabase
        val cursor=db.rawQuery(strsql,null)
        showRecord(cursor)
        cursor.close()
        db.close()
    }

    private fun showRecord(cursor: Cursor) {
        cursor.moveToFirst()
        val recordCOunt = cursor.count
        val attrcount=cursor.columnCount
        val activity = context as MainActivity
        activity.binding.tableLayout.removeAllViewsInLayout()
        //타이를 만들기
        val tablerow= TableRow(activity)
        val rowParam=TableRow.LayoutParams(TableRow.LayoutParams.MATCH_PARENT,TableRow.LayoutParams.WRAP_CONTENT)
        tablerow.layoutParams=rowParam
        val viewParam = TableRow.LayoutParams(0,100,1f)
        for(i in 0 until attrcount)   {
            val textView = TextView(activity)
            textView.layoutParams= viewParam
            textView.text = cursor.getColumnName(i)
            textView.setBackgroundColor(Color.LTGRAY)
            textView.textSize = 15.0f
            textView.gravity = Gravity.CENTER
            tablerow.addView(textView)
        }
        activity.binding.tableLayout.addView(tablerow)
        if(cursor.count==0) return
        //레코드 추기하기
        do{
            val row = TableRow(activity)
            row.layoutParams=rowParam
            for(i in 0 until attrcount)   {
                val textView = TextView(activity)
                textView.layoutParams= viewParam
                textView.text = cursor.getString(i)
                textView.textSize = 15.0f
                textView.gravity = Gravity.CENTER
                row.addView(textView)
            }
            activity.binding.tableLayout.addView(tablerow)
        }while (cursor.moveToNext())
    }

    fun insertProduct(product: Product):Boolean{
        val values = ContentValues()
        values.put(PNAME,product.pName)
        values.put(PQUANTITY,product.pQuantity)
        val db=writableDatabase
        val flag = db.insert(TABLE_NAME,null,values)>0
        db.close()
        return flag

    }

    //테이블 생성
    override fun onCreate(db: SQLiteDatabase?) {
        val create_table = "create table if not exists $TABLE_NAME("+
                "$PID integer primary key autoincrement, "+
                "$PNAME text, " +
                "$PQUANTITY integer);"
        db!!.execSQL(create_table)

    }
    //업그래드하는 기능
    override fun onUpgrade(db: SQLiteDatabase?, oldVersion: Int, newVersion: Int) {
        val drop_table ="drop table if exists $TABLE_NAME;"
        db!!.execSQL(drop_table)
        onCreate(db)
    }

    fun findProduct(name: String): Boolean {
        val strsql = "select * from $TABLE_NAME where $PNAME = '$name';"
        val db=readableDatabase
        val cursor=db.rawQuery(strsql,null)
        val flag = cursor.count!=0
        showRecord(cursor)
        cursor.close()
        db.close()
        return flag
    }
}
트러블 : 해당 코드를 실행시 어플이 강제 종료되는 문제가 발생
원인
private fun showRecord(cursor: Cursor) {
        cursor.moveToFirst()
        val recordCOunt = cursor.count
        val attrcount=cursor.columnCount
        val activity = context as MainActivity
        activity.binding.tableLayout.removeAllViewsInLayout()
        //타이를 만들기
        val tablerow= TableRow(activity)
        val rowParam=TableRow.LayoutParams(TableRow.LayoutParams.MATCH_PARENT,TableRow.LayoutParams.WRAP_CONTENT)
        tablerow.layoutParams=rowParam
        val viewParam = TableRow.LayoutParams(0,100,1f)
        for(i in 0 until attrcount)   {
            val textView = TextView(activity)
            textView.layoutParams= viewParam
            textView.text = cursor.getColumnName(i)
            textView.setBackgroundColor(Color.LTGRAY)
            textView.textSize = 15.0f
            textView.gravity = Gravity.CENTER
            tablerow.addView(textView)
        }
        activity.binding.tableLayout.addView(tablerow)
        if(cursor.count==0) return
        //레코드 추기하기
        do{
            val row = TableRow(activity)
            row.layoutParams=rowParam
            for(i in 0 until attrcount)   {
                val textView = TextView(activity)
                textView.layoutParams= viewParam
                textView.text = cursor.getString(i)
                textView.textSize = 15.0f
                textView.gravity = Gravity.CENTER
                row.addView(textView)
            }
            activity.binding.tableLayout.addView(tablerow)
        }while (cursor.moveToNext())
    }
showRecord() 함수에서
마지막 부분의
activity.binding.tableLayout.addView(tablerow)
해당 부분에서 row 대신 tablerow를 추가한 문제가 있습니다.
activity.binding.tableLayout.addView(row)
이렇게 수정하면 어플이 정상 작동합니다.
'Android_Kotlin > Android_공부' 카테고리의 다른 글
fetchListData() 일반적인 디자인 패턴 (0) 2023.08.08 Fragment와 WebData 활용하기 (0) 2023.08.01 TextInputLayout 사용하기 (0) 2023.08.01 SQLite 실습1-2(추가 : 예외처리) (0) 2023.08.01 SQLite 실습1-2 (0) 2023.07.31 - 먼저 레이아웃을 만들어 줍니다.